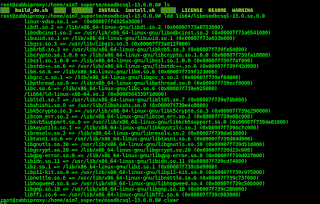
First registry on splunk.com
after that try to access: https://www.splunk.com/en_us/download/splunk-enterprise.html
download dpkg file
after that inside of your ubuntu server execute this command:
dpkg -i <your splunk setup>.deb
after to finish, access /opt/splunk
execute: /opt/splunk/bin/splunk start
if finish with successfuly you will receive this message:
To use the Splunk Web interface, point your browser at:
http://<hostname of your server>:8000

sexta-feira, 29 de dezembro de 2017
quinta-feira, 28 de dezembro de 2017
HOW TO PURGE FILE ON GRAYLOG SERVER
First execute this command:
For list indice files execute:
curl http://localhost:9200/_cat/indices
after that you just for example:
curl -XDELETE http://localhost:9200/graylog_0
For list indice files execute:
curl http://localhost:9200/_cat/indices
after that you just for example:
curl -XDELETE http://localhost:9200/graylog_0
segunda-feira, 13 de novembro de 2017
FORTIGATE TROUBLESHOOTING IPS ENGINE
First execute:
#diag test application ipsmonitor
IPS Engine Test Usage:
1: Display IPS engine information
2: Toggle IPS engine enable/disable status
3: Display restart log
4: Clear restart log
5: Toggle bypass status
6: Submit attack characteristics now
97: Start all IPS engines
98: Stop all IPS engines
99: Restart all IPS engines and monitor
After list those commands for choose some option execute the command like that:
sample:
diag test application ipsmonitor 99
sábado, 11 de novembro de 2017
HOW TO INSTALL OWASP ZAP IN UBUNTU 17.10
sudo sh -c "echo 'deb http://download.opensuse.org/repositories/home:/cabelo/xUbuntu_17.04/ /' > /etc/apt/sources.list.d/owasp-zap.list"
sudo apt-get update
sudo apt-get install owasp-zap
You can add the repository key to apt. run:
wget -nv https://download.opensuse.org/repositories/home:cabelo/xUbuntu_17.04/Release.key -O Release.key
sudo apt-key add - < Release.key
sudo apt-get update
procedure source:
https://software.opensuse.org/download.html?project=home%3Acabelo&package=owasp-zap
Recently this procedure doesn't work more because repository is not available.
and was do that:
# Java should be installed
# sudo apt-get install openjdk-7-jre-lib openjdk-7-jre-headless openjdk-7-jre icedtea-7-jre-jamvm icedtea-7-jre-cacao icedtea-7-plugin
# sudo update-alternatives --config java
mkdir ~/src/ && cd ~/src/
wget https://github.com/zaproxy/zaproxy/releases/download/2.5.0/ZAP_2.5.0_Linux.tar.gz
tar -xzvf ZAP_2.5.0_Linux.tar.gz
rsync -av ZAP_2.5.0/ /opt/zaproxy/
source: https://gist.github.com/fedir/f759c979489f8ab4bf2913dbbc4cdcb6
sudo apt-get update
sudo apt-get install owasp-zap
You can add the repository key to apt. run:
wget -nv https://download.opensuse.org/repositories/home:cabelo/xUbuntu_17.04/Release.key -O Release.key
sudo apt-key add - < Release.key
sudo apt-get update
procedure source:
https://software.opensuse.org/download.html?project=home%3Acabelo&package=owasp-zap
Recently this procedure doesn't work more because repository is not available.
and was do that:
# Java should be installed
# sudo apt-get install openjdk-7-jre-lib openjdk-7-jre-headless openjdk-7-jre icedtea-7-jre-jamvm icedtea-7-jre-cacao icedtea-7-plugin
# sudo update-alternatives --config java
mkdir ~/src/ && cd ~/src/
wget https://github.com/zaproxy/zaproxy/releases/download/2.5.0/ZAP_2.5.0_Linux.tar.gz
tar -xzvf ZAP_2.5.0_Linux.tar.gz
rsync -av ZAP_2.5.0/ /opt/zaproxy/
source: https://gist.github.com/fedir/f759c979489f8ab4bf2913dbbc4cdcb6
domingo, 5 de novembro de 2017
HOW TO EXECUTE COMMAND FOR KASPERSKY ENDPOINT SECURITY FOR LINUX - UBUNTU
FOR SEE SOME CONTRACTS AND TERMS AND INSTALL DEFINITION:
cd /opt/kaspersky/kesl/doc
FOR EXECUTE BINARY FILES:
cd /opt/kaspersky/kesl/bin
list files:
fanotify-checker kesl-control kesl_launcher.sh kesl-setup.pl kesl-uninstall.pl wdserver
#LIST INFORMATION OF INSTALLED VERSION
./kesl-control -S
#RESULT:
Name : Kaspersky Endpoint Security 10 for Linux
Version : 10.0.0.3458
Key status : Valid
License expiration date : 2017-12-04
Backup state : No objects in backup
Backup space usage : Backup size is unlimited
Scan_My_Computer last run date : Never run
Anti-virus databases loaded : Yes
Anti-virus databases date : 2017-11-05 06:36:00
Anti-virus databases records : 11164094
Protection status : OAS enabled
KSN state : On
cd /opt/kaspersky/kesl/doc
ls
autoinstall.ini ksn_license.de ksn_license.en ksn_license.fr ksn_license.ru legal_notices.txt license.de license.en license.fr license.ru
for check configuration used for installation you can cat the file: autoinstall.ini
FOR EXECUTE BINARY FILES:
cd /opt/kaspersky/kesl/bin
list files:
fanotify-checker kesl-control kesl_launcher.sh kesl-setup.pl kesl-uninstall.pl wdserver
#LIST INFORMATION OF INSTALLED VERSION
./kesl-control -S
#RESULT:
Name : Kaspersky Endpoint Security 10 for Linux
Version : 10.0.0.3458
Key status : Valid
License expiration date : 2017-12-04
Backup state : No objects in backup
Backup space usage : Backup size is unlimited
Scan_My_Computer last run date : Never run
Anti-virus databases loaded : Yes
Anti-virus databases date : 2017-11-05 06:36:00
Anti-virus databases records : 11164094
Protection status : OAS enabled
KSN state : On
#LIST TASKS
./kesl-control -T --get-task-list
#RESULT
Number of tasks: 10
Name: File_Monitoring
ID : 1
Type : OAS
State : Started
Name: Scan_My_Computer
ID : 2
Type : ODS
State : Stopped
Name: Scan_File
ID : 3
Type : ODS
State : Stopped
Name: Boot_Scan
ID : 4
Type : BootScan
State : Stopped
Name: Memory_Scan
ID : 5
Type : MemoryScan
State : Stopped
Name: Update
ID : 6
Type : Update
State : Stopped
Name: Rollback
ID : 7
Type : Rollback
State : Stopped
Name: Retranslate
ID : 8
Type : Retranslate
State : Stopped
Name: License
ID : 9
Type : License
State : Started
Name: Backup
ID : 10
Type : Backup
State : Started
#RESUME TASK SELECTED
./kesl-control -T --resume-task <SET ID>
#CHECK DE SCHEDULE FROM THE TASK
./kesl-control -T --get-schedule <SET ID>
#GET SETTINGS OF TASK
./kesl-control -T --get-settings <SET ID>
sábado, 4 de novembro de 2017
HOW TO WORK USB DEVICES ON VIRTUAL BOX ON UBUNTU 17.10
sudo usermod -aG vboxusers <youruser>
sudo apt-get install gnome-system-tools
sudo apt install virtualbox virtualbox-guest-additions-iso
sudo apt install virtualbox-ext-pack
sudo apt-get install gnome-system-tools
restart your computer
sudo apt-get install gnome-system-tools
sudo apt install virtualbox virtualbox-guest-additions-iso
sudo apt install virtualbox-ext-pack
sudo apt-get install gnome-system-tools
restart your computer
domingo, 29 de outubro de 2017
HOW TO EDIT A WALLPAPER FOLDER AND DEFAULT FOLDER
ADD THIS FILDE CODE:
<wallpaper>
<name><NAME OF YOUR WALLPAPER></name>
<filename>/usr/share/backgrounds/<NAME OF YOUR WALLPAPER>.jpg</filename>
<options>zoom</options>
<pcolor>#000000</pcolor>
<scolor>#000000</scolor>
<shade_type>solid</shade_type>
</wallpaper>
INSIDE OF THIS FILE :
root@mac-os:/usr/share/gnome-background-properties# vi zesty-wallpapers.xmlMOVE YOUR WALLPAPER FOR THIS FOLDER
root@mac-os:/usr/share/backgrounds
and just try to change your wallpaper.
terça-feira, 10 de outubro de 2017
sexta-feira, 6 de outubro de 2017
HOW TO CLONE VIRTUAL MACHINE FROM ORACLE VM (VIRTUAL BOX)
After copy/ past your virtual machine, just open terminal and access the folder of virtual machine and execute this command:
VBoxManage internalcommands sethduuid <youmachine>.vdisexta-feira, 29 de setembro de 2017
HOW TO INSTALL GRAFANA IN UBUNTU 16.04 LTS AND INTEGRATE WITH GRAFANA
wget https://s3-us-west-2.amazonaws.com/grafana-releases/release/grafana_4.5.2_amd64.deb
sudo apt-get install -y adduser libfontconfig
sudo dpkg -i grafana_4.5.2_amd64.deb
sudo service grafana-server start
sudo update-rc.d grafana-server defaults
sudo systemctl enable grafana-server.service
http://<yourip>:3000/login
for access your grafana server :
http://<your.ip>:3000
default user: admin
defaul pass: admin
for integration with zabbix execute:
sudo grafana-cli plugins list-remote
sudo grafana-cli plugins install alexanderzobnin-zabbix-app
grafana-cli plugins install raintank-worldping-app
sudo apt-get install -y adduser libfontconfig
sudo dpkg -i grafana_4.5.2_amd64.deb
sudo service grafana-server start
sudo update-rc.d grafana-server defaults
sudo systemctl enable grafana-server.service
http://<yourip>:3000/login
for access your grafana server :
http://<your.ip>:3000
default user: admin
defaul pass: admin
for integration with zabbix execute:
sudo grafana-cli plugins list-remote
sudo grafana-cli plugins install alexanderzobnin-zabbix-app
plugins granafa installed:
terça-feira, 26 de setembro de 2017
HOW TO GRANT REMOTE ACCESS ON MYSQL 14.14 AND UBUNTU 16.04 LTS
Access you mysql server by terminal :
vi /etc/mysql/mysql.conf.d/mysqld.cnf
comment the line:
from: bind-address = 127.0.0.1
vi /etc/mysql/mysql.conf.d/mysqld.cnf
comment the line:
from: bind-address = 127.0.0.1
for: #bind-address = 127.0.0.1
execute: service mysql restart
after that, connect on your mysql server and execute this command:
GRANT ALL PRIVILEGES ON *.* TO '<YOURUSERNAME>'@'<YOUIPD>' IDENTIFIED BY '<YOUPASSWORD>' WITH GRANT OPTION;
SHOW GRANTS;
GRANT ALL PRIVILEGES ON *.* TO '<YOURUSERNAME>'@'<YOUIPD>' IDENTIFIED BY '<YOUPASSWORD>' WITH GRANT OPTION;
SHOW GRANTS;
LINUX COMMANDS
In terminal execute vi and if you want copy past line execute: Y Y P
For include start service: update-rc.d <linux service> enable/disable
For list services for list to start automatically: ls /etc/rc*.d
For check distr: lsb_release -a
HOW TO USE SQLCMD ON UBUNTU FOR QUERY MICROSOFT SQL
First
apt-get install -y libgss3
After download the mssodbc
execute download https://mega.nz/#!zM9x3DLZ
key for download:
!jFEs2CIynSBWLDMwmctXJsMM35DeIPn24EQj1rbQzWM
tar -zxvf msodbcsql-13.0.0.0.tar.gz
access the folder msodbcsql-13.0.0.0 for check if there are some library missing for start the instalation. execute this command:
ldd /lib64/libmsodbcsql-13.0.so.0.0
If there is no missing lib execute:

Accept the terms and waiting the installation.
After installation finish eheck if there is a lib msql installed:

For execute the test follow the command syntax:

detail syntax:
sqlcmd -S <yourserver>\\<yourdatabase>,<yourportsql> -U <youruser> -P <yourpassword> -i <yourscriptsql>.sql
Normaly the script sql is your query sql
apt-get install -y libgss3
After download the mssodbc
execute download https://mega.nz/#!zM9x3DLZ
key for download:
!jFEs2CIynSBWLDMwmctXJsMM35DeIPn24EQj1rbQzWM
tar -zxvf msodbcsql-13.0.0.0.tar.gz
access the folder msodbcsql-13.0.0.0 for check if there are some library missing for start the instalation. execute this command:
ldd /lib64/libmsodbcsql-13.0.so.0.0

If there is no missing lib execute:
Accept the terms and waiting the installation.
After installation finish eheck if there is a lib msql installed:

For execute the test follow the command syntax:
detail syntax:
sqlcmd -S <yourserver>\\<yourdatabase>,<yourportsql> -U <youruser> -P <yourpassword> -i <yourscriptsql>.sql
Normaly the script sql is your query sql
segunda-feira, 18 de setembro de 2017
HOW TO ALLOW ACCESS TO ENTERPRISE ONX SAT SYSTEM
server_onix_sat 189.113.152.153
189.113.149.200
189.113.149.70 8080
onix_sat 80 tcp
5398 tcp
urls:
www.google-analytics.com
maplink.uol.com.br
www.onixsat.com.br
go.onixsat.com.br
arquivos.onixsat.com.br
enterprise.onixsat.com.br
lbs.onixsat.com.br
service.onixsat.com.br
transito.lbslocal.com
source: http://enterprise.onixsat.com.br/conn-tutorial/?linkid=80001
domingo, 17 de setembro de 2017
HOW TO DETECT WINDOWS SERVER 2012 R2 DNS INFORMATION
Execute:
dnscmd /zoneinfo <yourdomain>
dnscmd /info
dnscmd /zoneinfo <yourdomain>
dnscmd /info
sábado, 16 de setembro de 2017
HOW TO FIX "I CANT DELETE ANY FILES" MY USER IS ROOT (SUDOERS) BUT ICAN'T DELETE ANY FILES
When was detect this problem "icant delete any file"
was reboted my host, after that was detect the message busybox-built-in-shell and following this commands:
https://vi4nn4network.blogspot.com.br/2017/09/how-to-fix-error-busybox-built-in-shell.html
was reboted my host, after that was detect the message busybox-built-in-shell and following this commands:
https://vi4nn4network.blogspot.com.br/2017/09/how-to-fix-error-busybox-built-in-shell.html
HOW TO FIX ERROR BUSYBOX BUILT-IN SHELL (INITRAMFS) ON EVERY BOOT
execute:
after this message put:
fsck /dev/sda1
after this message put:
fsck /dev/sda1
segunda-feira, 11 de setembro de 2017
HOW TO HARDENING APACHE 2.4.18 ON UBUNTU SERVER 16.04 LTS
Fisrt check the versions:
apache2 -v # check version apache:
my result: apache 2.4.18
lsb_release -a # check ubuntu version
my result: ubuntu 16.04.3 lts
2:Apache version disable:
for:
3: Default Apache page disable
apache2 -v # check version apache:
my result: apache 2.4.18
lsb_release -a # check ubuntu version
my result: ubuntu 16.04.3 lts
1: Directory list disble
vi /etc/apache2/apache2.comf
change from:
<Directory /var/www/>
Options Indexes FollowSymLinks
AllowOverride None
Require all granted
</Directory>
for:
<Directory /var/www/>
Options Indexes FollowSymLinks
AllowOverride None
Require all denied
</Directory>
/etc/apache2/conf-enabled/security.conf
change from:
ServerSignature On
ServerTokens OS
ServerSignature Off
ServerTokens Prod
3: Default Apache page disable
rename default page for old:
mv /var/www/html/index.html /var/www/html/index.html.old
domingo, 3 de setembro de 2017
HOW TO INSTALL ZABBIX-SERVER 3.4.1 ON UBUNTU SERVER 16.04 LTS
apt-get update
apt-get install apache2
apt-get install php (will be install php 7)
apt-get install mysql
apt-get install mysql-server
apt-get install php7.0-xml php7.0-bcmath php7.0-mbstring
apt-get install libapache2-mod-php
apt-get install a2enmod php7.0
wget http://repo.zabbix.com/zabbix/3.4/ubuntu/pool/main/z/zabbix-release/zabbix-release_3.4-1+xenial_all.deb
dpkg -i zabbix-release_3.4-1+xenial_all.deb
apt-get update
apt-get install zabbix-server-mysql zabbix-frontend-php
mysql -uroot -p<your_root_password>
create user 'zabbix'@'localhost' identified by 'your_zabbix_password';
create database zabbix character set utf8 collate utf8_bin;
grant all privileges on zabbix.* to zabbix@localhost identified by 'your_zabbix_password';
flush privileges;
quit mysql database
zcat /usr/share/doc/zabbix-server-mysql/create.sql.gz | mysql -uzabbix -p zabbix
put the zabbix_user from mysql
vi /etc/zabbix/zabbix_server.conf
add the password of zabbix user from database zabbix
service zabbix-server start
update-rc.d zabbix-server enable /etc/apache2/conf-enabled/zabbix.conf <<some times after execute this command there is a erro about locale, than you must execute this command dpkg-reconfigure locales to fix first for run again this command>>
vi /etc/zabbix/apache.conf
<IfModule mod_php7.c>
php_value max_execution_time 300
php_value memory_limit 128M
php_value post_max_size 16M
php_value upload_max_filesize 2M
php_value max_input_time 300
php_value always_populate_raw_post_data -1
# php_value date.timezone Europe/Riga <<<change for your native region>>
php_value date.timezone America/Sao_Paulo
</IfModule>
service apache2 restart
apt-get install zabbix-agent
service zabbix-agent start
for finish, you must fix those errors:

- Time zone for PHP is not set (configuration parameter "date.timezone").
- PHP bcmath extension missing (PHP configuration parameter --enable-bcmath).
- PHP mbstring extension missing (PHP configuration parameter --enable-mbstring).
- PHP xmlwriter extension missing.
- PHP xmlreader extension missing.
for 1: add time zone for both field <php5 and php7> tag on, /etc/apache2/conf-enabled/zabbix.conf
for 2: you must execute apt-get install php-bcmath
for 3: you must execute apt-get install php-mbstring
for 4: you must execute apt-get install php-xmlwriter
for 5: you must execute apt-get install php-xmlreader
for finish restart apache service and php by this way:
/etc/init.d/apache2 restart
and just finish the wizard
Source: https://www.zabbix.com/documentation/3.4/manual/installation/install#installing_frontend
sábado, 2 de setembro de 2017
HOW TO INSTALL ANDROID STUDIO ON UBUNTU AND FIX PROBLEM
add-apt-repository ppa:ubuntu-desktop/ubuntu-make
apt-get update
apt-get install ubuntu-make
If you have a problem like that:
ERROR: Unhandled exception
Traceback (most recent call last):
File "/usr/lib/python3/dist-packages/umake/tools.py", line 158, in wrapper
function(*args, **kwargs)
File "/usr/lib/python3/dist-packages/umake/ui/__init__.py", line 56, in display
cls.currentUI._display(contentType)
File "/usr/lib/python3/dist-packages/umake/ui/cli/__init__.py", line 61, in _display
contentType.run_callback(result=rlinput(contentType.content, contentType.default_input))
File "/usr/lib/python3/dist-packages/umake/interactions/__init__.py", line 141, in run_callback
self._callback_fn(result)
File "/usr/lib/python3/dist-packages/umake/frameworks/baseinstaller.py", line 152, in confirm_path
if os.listdir(path_dir):
PermissionError: [Errno 13] Permission denied: '/root/.local/share/umake/android/android-studio'

execute first :
sudo -s
unset SUDO_UID
unset SUDO_GID
After, for finish the correctly installation execute again
apt-get install ubuntu-make
for remover you can do that:
umake android --remove
for remover you can do that:
umake android --remove
segunda-feira, 14 de agosto de 2017
HOW TO DETECT A VALID IP FROM TERMINAL
curl -s http://checkip.dyndns.org/ | sed 's/[a-zA-Z<>/ :]//g'
sábado, 15 de julho de 2017
HOW TO START A FORENSE BROWSER ANALYZER ON (IE, FIREFOX AND GOOGLE CHROME)
For mozilla:
http://www.nirsoft.net/utils/mozilla_cache_viewer.html
For ie:
http://www.nirsoft.net/utils/ie_cache_viewer.html
For chrome:
http://www.nirsoft.net/utils/chrome_cache_view.html
for everyone:
http://www.nirsoft.net/utils/browsing_history_view.html
http://www.nirsoft.net/utils/mozilla_cache_viewer.html
For ie:
http://www.nirsoft.net/utils/ie_cache_viewer.html
For chrome:
http://www.nirsoft.net/utils/chrome_cache_view.html
for everyone:
http://www.nirsoft.net/utils/browsing_history_view.html
terça-feira, 13 de junho de 2017
HOW TO SOLVE ISSUES FOR IMPLEMENTED SOPHOS TRANSPARENT AUTENTICATION SERVICE (STAS)
First problem that was found, is the detail about the fqn field and just wins server.. following the print to help on this configuration

The second error that was found is for start the service of SSO client on the server, that was checked this erro for start the service:

Was solved just found the service and set a user and password :

More detail about the next configuration following this video: https://www.youtube.com/watch?v=4Z5VZ1EIzgc

The second error that was found is for start the service of SSO client on the server, that was checked this erro for start the service:

Was solved just found the service and set a user and password :
More detail about the next configuration following this video: https://www.youtube.com/watch?v=4Z5VZ1EIzgc
sexta-feira, 26 de maio de 2017
HOW TO INSTALL KASPERSKY ANTIVÍRUS FOR GNU LINUX
FOR INSTALL KASPERSKY NETWORK AGENT :
REQUIREMENTS THE SAME FOR KASPERSKY ENDPOINT FOR LINUX
DOWNLOAD AGENT FOR DEB:
DOWNLOAD AGENT FOR RPM:
https://products.s.kaspersky-labs.com/multilanguage/endpoints/kesl/klnagent-10.1.1-26.i386.rpm
HOW TO INSTALL:
https://support.kaspersky.com/5108
AFTER EXECUTE "HOW TO INSTALL" PROCEDURE FOLLOWING THIS PROCEDURE:
PAGE 24
Installing Network Agent
SOURCE: https://docs.s.kaspersky-labs.com/english/kes10_linux_adminguide_en.pdf
FOR INSTALLATION ON LINUX WORKSTATION OR LINUX SERVER:
REQUIREMENTS:
http://support.kaspersky.com/kes10linux#requirements
DOWNLOAD RPMX86:
https://products.s.kaspersky-labs.com/multilanguage/endpoints/kesl/kesl-10.0.0-3458.i386.rpm
DOWNLOAD RPMX64:
https://products.s.kaspersky-labs.com/multilanguage/endpoints/kesl/kesl-10.0.0-3458.i386.rpm
DOWNLOAD DEBX86:
https://products.s.kaspersky-labs.com/multilanguage/endpoints/kesl/kesl_10.0.0-3458_i386.deb
DOWNLOAD DEBX64:
https://products.s.kaspersky-labs.com/multilanguage/endpoints/kesl/kesl_10.0.0-3458_amd64.deb
AFTER EXECUTE "HOW TO INSTALL" PROCEDURE FOLLOWING THIS PROCEDURE:
PAGE 23
Installing the Kaspersky Endpoint Security package
Updating Kaspersky Endpoint Security settings
SOURCE: https://docs.s.kaspersky-labs.com/english/kes10_linux_adminguide_en.pdf
HOW TO INSTALL A CUSTOM INSTALLATION:
https://support.kaspersky.com/5110
HOW TO INSTALL BY KSC:
https://support.kaspersky.com/7626
REQUIREMENTS THE SAME FOR KASPERSKY ENDPOINT FOR LINUX
DOWNLOAD AGENT FOR DEB:
https://products.s.kaspersky-labs.com/multilanguage/endpoints/kesl/klnagent_10.1.1-26_i386.deb
DOWNLOAD AGENT FOR RPM:
https://products.s.kaspersky-labs.com/multilanguage/endpoints/kesl/klnagent-10.1.1-26.i386.rpm
HOW TO INSTALL:
https://support.kaspersky.com/5108
AFTER EXECUTE "HOW TO INSTALL" PROCEDURE FOLLOWING THIS PROCEDURE:
PAGE 24
Installing Network Agent
SOURCE: https://docs.s.kaspersky-labs.com/english/kes10_linux_adminguide_en.pdf
FOR INSTALLATION ON LINUX WORKSTATION OR LINUX SERVER:
REQUIREMENTS:
http://support.kaspersky.com/kes10linux#requirements
DOWNLOAD RPMX86:
https://products.s.kaspersky-labs.com/multilanguage/endpoints/kesl/kesl-10.0.0-3458.i386.rpm
DOWNLOAD RPMX64:
https://products.s.kaspersky-labs.com/multilanguage/endpoints/kesl/kesl-10.0.0-3458.i386.rpm
DOWNLOAD DEBX86:
https://products.s.kaspersky-labs.com/multilanguage/endpoints/kesl/kesl_10.0.0-3458_i386.deb
DOWNLOAD DEBX64:
https://products.s.kaspersky-labs.com/multilanguage/endpoints/kesl/kesl_10.0.0-3458_amd64.deb
AFTER EXECUTE "HOW TO INSTALL" PROCEDURE FOLLOWING THIS PROCEDURE:
PAGE 23
Installing the Kaspersky Endpoint Security package
Updating Kaspersky Endpoint Security settings
SOURCE: https://docs.s.kaspersky-labs.com/english/kes10_linux_adminguide_en.pdf
HOW TO INSTALL A CUSTOM INSTALLATION:
https://support.kaspersky.com/5110
HOW TO INSTALL BY KSC:
https://support.kaspersky.com/7626
terça-feira, 9 de maio de 2017
HOW TO ENABLE PERMISSION FOR SUBFOLDERS
root@rocket-chat:/var/www# chmod +x /var/www/html/tmve/ -R
root@rocket-chat:/var/www# chown www-data:www-data /var/www/html/tmve/ -R
root@rocket-chat:/var/www# chown www-data:www-data /var/www/html/tmve/ -R
quarta-feira, 3 de maio de 2017
HOW TO INSTALL LINUX PHPBB SERVER (FORUM SERVER) ON YOUR UBUNTU SERVER 16.04.2 LTS
install linux server with the lamp feature
after that
sudo apt-get install php-xml
service apache2 restart
wget https://www.phpbb.com/files/release/phpBB-3.2.0.zip
unzip phpBB-3.2.0.zip
cp -r phpBB3 /var/www/html
chown www-data:www-data -R /var/www/html/phpBB3
chmod 775 -R /var/www/html/phpBB3
mysql -uroot -p
create database phpbb;
exit
http://<your_ip>/phpBB3/install/app.php
check the requirements, if you have a message:
Directory is not writable
sudo usermod -aG www-data <your_user>
sudo chown -R www-data:www-data /var/www/html/
cd /var/www/html/phpBB3
sudo chmod 660 images/avatars/upload/ config.php
sudo chmod 770 store/ cache/ files/
After those procedures will work file the requirements and you carry on the steps about the installation and configuration.
So, now you must rename or dell the folder install inside of /var/www/html/phpBB3/
in my case was renamed folder phpBB3 for phpbb and inside of folder: "/var/www/html/phpbb" was renamed the folder install for installl.
After that was possible to see everthing about the forum phpbb.
In some cases for attached files was necessary add this configuration about extension GD on my php server:
sudo add-apt-repository ppa:ondrej/php
sudo apt-get update
sudo apt-get install php7.0-gd
sexta-feira, 28 de abril de 2017
HOW TO CHECK VIDEO GRAPHIC DRIVE INSTALLED ON YOUR GNU/LINUX UBUNTU
apt install mesa-utils
glxinfo
lspci -v|less
glxinfo
lspci -v|less
quarta-feira, 26 de abril de 2017
HOW TO LOAD ANDROID APP ON GNU/LINUX UBUNTU
excute without root user: sudo snap install --classic anbox-installer && anbox-installer put the password of root user.
before if you have some problem with a permission in *.desktop file execute:
chmod + x *.desktop


after install the anbox, is possible for you install the next app by this way: first, download file apk and execute this command: adb install <apk file>.apk
if you have some issue for execute the file before installed, execute this command again:
chmod + x *.desktop

HOW TO SOLVED - DEBIAN DELAY STREAMING
Was observed, every streaming that i try load by debian, i had many delay by:
Following the packet and procedure:
aptitude install gstreamer0.10-fluendo-mp3 gstreamer0.10-plugins-really-bad ffmpeg sox twolame vorbis-tools lame faad
apt-get install libavcodec-extra
apt-get install w32codecs
apt-get install w64codecs
wget http://ftp.us.debian.org/debian/pool/main/n/node-delayed-stream/node-delayed-stream_0.0.5-1_all.deb
wget http://www.deb-multimedia.org/pool/non-free/w/w64codecs/w64codecs_20071007-dmo2_amd64.deb
dpkg -i w64codecs_20071007-dmo2_amd64.deb
dpkg -i node-delayed-stream_0.0.5-1_all.deb
- vlc player
- youtube
- netflix
Following the packet and procedure:
aptitude install gstreamer0.10-fluendo-mp3 gstreamer0.10-plugins-really-bad ffmpeg sox twolame vorbis-tools lame faad
apt-get install libavcodec-extra
apt-get install w32codecs
apt-get install w64codecs
wget http://ftp.us.debian.org/debian/pool/main/n/node-delayed-stream/node-delayed-stream_0.0.5-1_all.deb
wget http://www.deb-multimedia.org/pool/non-free/w/w64codecs/w64codecs_20071007-dmo2_amd64.deb
dpkg -i w64codecs_20071007-dmo2_amd64.deb
dpkg -i node-delayed-stream_0.0.5-1_all.deb
segunda-feira, 24 de abril de 2017
HOW TO IMPROVE YOUR LOG ANALYZER IN LINUX /VAR/LOG/SYSLOG
First of all start by :
apt-get install lnav.
after that, you can see your syslog and search by this way:
#lnav
apt-get install lnav.
after that, you can see your syslog and search by this way:
#lnav
quinta-feira, 13 de abril de 2017
HOW TO USE BGINFO
First, make download from:
https://technet.microsoft.com/en-us/sysinternals/bginfo.aspx
After that, execute on your machine and define the information that you want describe on your wallpaper. and save with the name info.bgi
After define the detail that you need to show, save the info.bgi on the same folder.
add the folder bginfo and move your folder for netlogon folder located on domain controller .
In my case, inside of folder was created:
Bginfo.exe <file downloaded from web site microsoft technet>
Eula.txt <file downloaded from web site microsoft technet>
info.bgi <file created from Bginfo.exe>
file.bat <file created with code line down>

When you goto create a file info.bgi, before execute this procedure:
Set bitmap / location,

And set User's application data directory and click ok

and create a file.bat on the same folder with this code line:
\\<your_domain_controller>\NETLOGON\BGinfo\Bginfo.exe \\<your_domain_controller>\NETLOGON\BGinfo\info.bgi /timer:0 /accepteula

in my case my domain controller:
\\dc.viannas.local\NETLOGON\BGinfo\Bginfo.exe \\dc.viannas.local\NETLOGON\BGinfo\info.bgi /timer:0 /accepteula
Move every file on network folder:
\\dc.viannas.local\NETLOGON\BGinfo\
Now, go for your AD server and open Group Policy manager go for:
Forest:<your domain>
Domains
viannas.local
and access Group policy object field and create a group policy objetcts with name bginfo. After this procedure, edit this Gpo by right click, edit.
I'll open a Group Policy management editor, here follow this way:
Go for:
User Configuration
Policies
Windows Settings
Scripts (logon/logout)
Edit logon by properties option
On the field scripts, click em add and set the bat file in my case, file.bat for this configuration.
After that, execute gpupdate /force on all your computer on domain and check the result:

Obs, in some cases i must restart the computers.
Was tested on: 2012r2, 7x64, 7x32, 10x32
https://technet.microsoft.com/en-us/sysinternals/bginfo.aspx
After that, execute on your machine and define the information that you want describe on your wallpaper. and save with the name info.bgi
After define the detail that you need to show, save the info.bgi on the same folder.
add the folder bginfo and move your folder for netlogon folder located on domain controller .
In my case, inside of folder was created:
Bginfo.exe <file downloaded from web site microsoft technet>
Eula.txt <file downloaded from web site microsoft technet>
info.bgi <file created from Bginfo.exe>
file.bat <file created with code line down>

When you goto create a file info.bgi, before execute this procedure:
Set bitmap / location,

And set User's application data directory and click ok

and create a file.bat on the same folder with this code line:
\\<your_domain_controller>\NETLOGON\BGinfo\Bginfo.exe \\<your_domain_controller>\NETLOGON\BGinfo\info.bgi /timer:0 /accepteula

in my case my domain controller:
\\dc.viannas.local\NETLOGON\BGinfo\Bginfo.exe \\dc.viannas.local\NETLOGON\BGinfo\info.bgi /timer:0 /accepteula
Move every file on network folder:
\\dc.viannas.local\NETLOGON\BGinfo\
Forest:<your domain>
Domains
viannas.local
and access Group policy object field and create a group policy objetcts with name bginfo. After this procedure, edit this Gpo by right click, edit.
I'll open a Group Policy management editor, here follow this way:
Go for:
User Configuration
Policies
Windows Settings
Scripts (logon/logout)
Edit logon by properties option
On the field scripts, click em add and set the bat file in my case, file.bat for this configuration.
After that, execute gpupdate /force on all your computer on domain and check the result:

Obs, in some cases i must restart the computers.
Was tested on: 2012r2, 7x64, 7x32, 10x32
quinta-feira, 6 de abril de 2017
HOW TO TROUBLESHOOTING FORTINET FOR CHECK HARDWARE AND NETWORK INTERFACE
check interface error
1)fnsysctl ifconfig
2)diag hardware deviceinfo nic wan1
3) fnsysctl cat /proc/net/dev
for track the session :
diagnose sys session filter dport 1521
diagnose sys session list
diagnose sys session clear
quarta-feira, 5 de abril de 2017
HOW TO INSTALL SNMP WALKER GUI FOR LINUX DEB
First: apt-get install snmp
If you have any problem, i recommend execute: apt --fix-broken install
Start download: qtmib, by : https://sourceforge.net/projects/qtmib/files/qtmib.deb/
After that, you could do this:
apt-get install snmp-mibs-downloader
sudo download-mibs
/etc/snmp/snmp.conf and comment the line
mibs :
for
#mibs :
restart the snmp service:
service /etc/init.d/snmpd restart or stop / start
for add aditional mibs, please, access:
/usr/share/snmp/mibs
quinta-feira, 16 de março de 2017
HOW TO MONITORING FROM ZABBIX SERVICES OF (KASPERSKY) TEMPLATE ZABBIX
Kaspersky manager consolee 9:
zbx_export_templateskaspersky_console_ksc9.xml https://mega.nz/#!GFtQCBgK!lM2Pfm4dkOyNXgmAFdFQbc-rQN_Np5bMgie2YllWf9M
Kaspersky manager consolee 10:
zbx_export_templateskaspersky_console_ksc10.xml https://mega.nz/#!mFU2HIxJ!rB2vL6GgbaEsLqckTngAUOFBcak4lLpgHg63v60Pthc
Kaspersky av agent 10:
zbx_export_templates_kaspersky_agent.xml https://mega.nz/#!HIVHyDhJ!wJxdBJcpa1kGzmZfsct3DHuFwllIyjbZDk4gj_xMp2U
Kaspersky av fs 10 e enterprise 8:
zbx_export_templates_services_kaspersky_av_fs_kes10
zbx_export_templates_kaspersky_av_fs_kes10.xml https://mega.nz/#!SMVBUSCT!DUoJkpDtM8AoG5706JGuYoyG_-7coMnIcipauLzVw7A
Kaspersky av wks 10:
zbx_export_templateskaspersky_av_wks_kes10.xml https://mega.nz/#!OQ8hzAYY!AjxzMYduV871F61LRg9cKJJwuEji4IU3RiELaL3pux8
HOW TO ENABLE SNMP COMMUNITIES ON ESXI
First, enable ssh on esxi and try to connect by terminal.
after that, execute this command:
#esxcli system snmp set --communities YOUR COMMUNITIE NAME
# esxcli system snmp set --enable true
if you have some issue for test with the command snmpwalk execute this configuration:
# esxcli network firewall ruleset set --ruleset-id snmp --allowed-all true
# esxcli network firewall ruleset set --ruleset-id snmp --enabled true
# /etc/init.d/snmpd restart
domingo, 12 de março de 2017
HOW TO REMOVE A SOFTWARE FROM DEPPIN OS WITHOUT TERMINAL
So, this procedure is simple, you must just click on right botton of your mouse about your program and select the option uninstall that must appear for your.
following the image bellow:

following the image bellow:

segunda-feira, 27 de fevereiro de 2017
HOW TO ENABLE WINDOWS POWERSHELL ISE ON YOUR SERVER
So, microsoft sometimes is not cleary for this procedure,
for windows server 2012r2 you must do that:
open your powershell on administrator mode and add this command:
Import-Module ServerManager
Add-WindowsFeature PowerShell-ISE

for windows server 2012 or 2008 and 2008 r2 you must do that first:
install windows framework manager 5.0 or above :
https://www.microsoft.com/en-us/download/details.aspx?id=50395
before make a download of windows powershell ise and install :
https://www.microsoft.com/en-us/download/details.aspx?id=50395
sexta-feira, 24 de fevereiro de 2017
HOW TO CREATE A MAIL REPORT OF MICROSOFT WINDOWS BACKUP STATUS
Fist of all install this application on your windows server:
1;Elevated PowerShell-session.
2;Windows Server Backup feature installed.
3; Feature common line tools of windows server backup feature must be enable too.
3;At least Windows Management Framework 3.0

After thtat, create a script folder on your server like : c:\scritpt\
move above script for this folder:
After that, custom the script for add email information:
email from,
email to,
smtp
and add on your task manager with this detail.
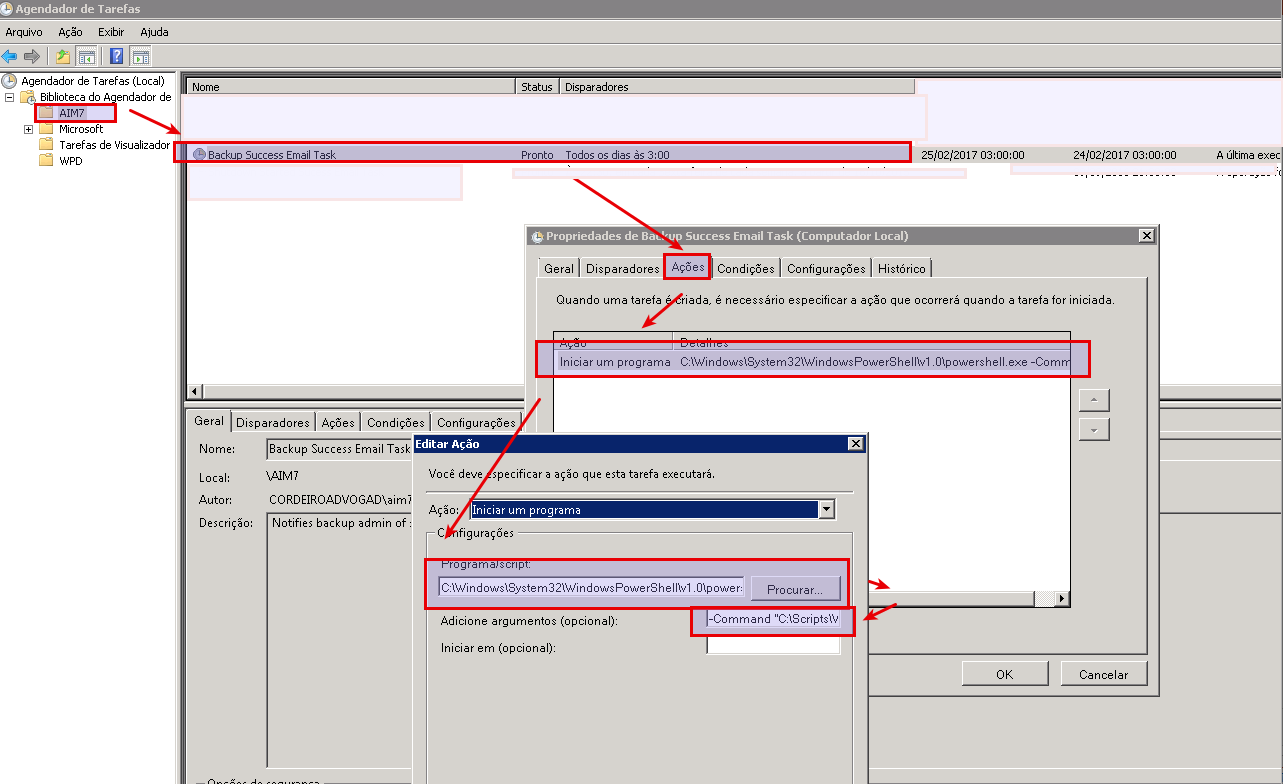
Script program:
C:\Windows\System32\WindowsPowerShell\v1.0\powershell.exe
Aditional arguments:
-Command "C:\Scripts\WBJobReport.ps1" -ExecutionPolicy Bypass
download above: wbjobreport.ps1:
###############################START SCRIPT####################################
<#
.SYNOPSIS
Windows Backup Mail Report
Written by Joakim, http://jocha.se
.DESCRIPTION
Version 4.1 - Updated 2016-05-31
This script will mail a report from the latest Windows Backup job, can also fetch and generate reports from remote servers. The script requires at least PowerShell v3.
.EXAMPLE
To automate this script, setup a scheduled task.
Name: Backup Email Task
Description: Notifies backup admin of scheduled backup status
Run whether user is logged on or not
Trigger > On event > Log=Microsoft-Windows-Backup/Operational > Source=Backup > Event ID(s)= 4,5,8,9,17,22,49,50,52,100,517,518,521,527,528,544,545,546,561,564,612
Action: Start a Program
Program: Powershell
Arguments: -Command "C:\Scripts\WBJobReport.ps1" -ExecutionPolicy Bypass
#>
#Add-PSSnapin Windows.ServerBackup -ErrorAction Silently
#######################################
#-------- Variables to change --------#
# Uncomment the two rows below and row 207 to enable "Remote Report" generation.
#$Servers = New-PSSession -Computername Server01, Server02, Server03
#Invoke-Command -Session $Servers {
# Set your Company name
$Company = "Cordeiro Advogados - Backup Local"
# Set the recipient/sender email-address
$MailTo = "youremail"
$MailFrom = "$Company "
# SMTP user account password
$MailUser = "youremail"
$MailPassword = "pass"
# SMTP Server
$MailServer = "yoursmtpserver"
# SMTP Port
$MailPort = 25
# If your server uses SSL, otherwise set to $false
$UseSSL = $false
#---- Don't change anything below ----#
#######################################
Try {
$CurrentTime = (Get-Date).ToString("yyyy-MM-dd HH:mm")
$Computer = Get-Content env:computername
$WBJob = Get-WBJob -Previous 1
$WBSummary = Get-WBSummary
$WBLastSuccess = ($WBSummary.LastSuccessfulBackupTime).ToString("yyyy-MM-dd HH:mm")
$WBResult = $WBSummary.LastBackupResultHR
$WBErrorMsg = $WBJob.ErrorDescription + "`n" + $WBSummary.DetailedMessage
$WBStartTime = $WBJob.StartTime
$WBEndTime = $WBJob.EndTime
$WBDuration = (New-TimeSpan -Start $WBStartTime -End $WBEndTime)
$Password = ConvertTo-SecureString $MailPassword -AsPlainText -Force
$Credentials = New-Object System.Management.Automation.PSCredential ($MailUser, $Password)
Function FormatBytes
{
Param
(
[System.Int64]$Bytes
)
[string]$BigBytes = ""
#Convert to TB
If ($Bytes -ge 1TB) {$BigBytes = [math]::round($Bytes / 1TB, 2); $BigBytes += " TB"}
#Convert to GB
ElseIf ($Bytes -ge 1GB) {$BigBytes = [math]::round($Bytes / 1GB, 2); $BigBytes += " GB"}
#Convert to MB
ElseIf ($Bytes -ge 1MB) {$BigBytes = [math]::round($Bytes / 1MB, 2); $BigBytes += " MB"}
#Convert to KB
ElseIf ($Bytes -ge 1KB) {$BigBytes = [math]::round($Bytes / 1KB, 2); $BigBytes += " KB"}
#If smaller than 1KB, leave at bytes.
Else {$BigBytes = $Bytes; $BigBytes += " Bytes"}
Return $BigBytes
}
Function Log-BackupItems
{
Param
(
[System.String]$Name,
[System.String]$Status,
[System.Int64]$Bytes
)
$Item = New-Object System.Object;
$Item | Add-Member -Type NoteProperty -Name "Name" -Value $Name;
$Item | Add-Member -Type NoteProperty -Name "Status" -Value $Status;
$Item | Add-Member -Type NoteProperty -Name "Size" -Value (FormatBytes -Bytes $Bytes);
Return $Item;
}
$results=@()
$WBJob | % {
$_.JobItems | % {
$BackupItem = $null
If ($_.Name -eq 'VolumeList') {
$_ | % {$_.SubItemList | % {
$BackupItem = Log-BackupItems -Name $_.Name -Status $_.State -Bytes $_.TotalBytes
$results += $BackupItem
}}
}
Else {
$_ | % {
$BackupItem = Log-BackupItems -Name $_.Name -Status $_.State -Bytes $_.TotalBytes
$results += $BackupItem
}
}
}
}
# Change Result of 0 to Success in green text and any other result as Failure in red text
If ($WBResult -eq 0) { $WBResult = "Successful"}
Else {$WBResult = "Failed"}
# Assemble the HTML Report
$HTMLMessage = @"
<!DOCTYPE html>
<html>
<head>
<title>$Company Microsoft Backup Local Report for $Computer</title>
<style>
body { font-family: Verdana, Geneva, Arial, Helvetica, sans-serif; font-size: 12px }
h3{ clear: both; font-size: 150%; margin-left: 20px;margin-top: 30px; }
table { padding: 15px 0 20px; width: 500px; text-align: left; }
td, th { padding: 0 20px 0 0; margin 0; text-align: left; }
th { margin-top: 15px }
a, a:visited { color: #2ea3f2; text-decoration: none; }
#Report { width: 600px; }
#Successful { color: green }
#Failed { color: red }
</style>
</head>
<body>
<div id="Report">
<p><h3><a href="http://jocha.se">$Company Backup Report for $Computer</a></p></h3>
<table id="summary"><tbody>
<tr><td>Todays date:</td>
<td>$CurrentTime</td></tr>
<tr><td>Last Successful Backup:</td>
<td>$WBLastSuccess</td></tr>
<tr><td>Start time last backup:</td>
<td>$WBStartTime</td></tr>
<tr><td>End time last backup:</td>
<td>$WBEndTime</td></tr>
<tr><td>Duration last backup:</td>
<td>$WBDuration</td></tr>
<tr><td>Backup Result:</td>
<td><b id="$WBResult">$WBResult</b></td></tr>
<tr><td>Error Message (if applicable):</td>
<td>$WBErrorMsg</td></tr></tbody></table>
$(
$html = $results | ConvertTo-HTML -Fragment
$xml=[xml]$html
$attr=$xml.CreateAttribute('id')
$attr.Value='items'
$xml.table.Attributes.Append($attr) | out-null
$html=$xml.OuterXml | out-string
$html
)
</div>
</body>
</html>
"@
$email = @{
SMTPServer = $MailServer
UseSSL = $UseSSL
BodyAsHtml = $true
Port = $MailPort
Credential = $Credentials
Encoding = ([System.Text.Encoding]::UTF8)
To = $MailTo
From = $MailFrom
Subject = "$WBResult Backup on $Computer"
Body = $HTMLMessage
}
Send-MailMessage @email
}
Catch {
# $email = @{
# SMTPServer = $MailServer
# BodyAsHtml = $true
# UseSSL = $UseSSL
#Port is a PowerShell v3 variable
# Port = $MailPort
# Credential = $Credentials
# Encoding = ([System.Text.Encoding]::UTF8)
# To = $MailTo
# From = $MailFrom
# Subject = "Failed Backup on $Computer"
# Body = "The backup script failed to run!"
#}
#Send-MailMessage @email
#}
# Uncomment below to enable "Remote Report".
}
#####################################END SCRIPT################################
source detail from: http://blog.jocha.se/tech/wbadmin-backup-mail-report
emprovements for your management: https://gallery.technet.microsoft.com/scriptcenter/Windows-Server-Backup-d5ae1172
Assinar:
Postagens (Atom)